OctoPi Tutorial for Zim

Hi everyone, I’ve posted a quick video tutorial on setting up OctoPi for Wifi Zim control here: OctoPi for Zim

OctoPi = OctoPrint on Raspberry Pi

I do not yet have many prints on this setup, but so far I’ve been quite impressed with the capabilities of OctoPrint itself. I believe the custom gcode scripts, controls, etc for Zim can be added to the web UI fairly easily. It could be a suitable drop-in replacement for the Zim software and web UI, with some customizations. I’ll post another video if I get more of this configuration sorted out.

Cheers!

5 Likes

Thanks jpod, quality stuff! :grin:

Thanks jpod.

I am trying to use the now obsolete WLAN dongle from Zim.
But regardless what I try, I keep getting a wpa_supplicant unable to start dameon and subsequently unable to start network and dhcp.
Did anyone manage to use the Zim WLAN dongle with octoprint?

I print with my ZIM and Octoprint since months and used several Kilograms of filament in this configuration - only had a problem once:

As my wLan dongle has a senergy safe function I could not connect anymore after returning several hours after my print started: therefore I’m using a network cable which is plugged into my RaspBerry and my router.
When I once disconnected the network cable during print, the RaspBerry (and OctoPi) stopped mid-print and I couldn’t restart it.
…but that’s the only problem I had to deal with in the last months -> recommend to use OctoPi to everyone here! :blush:

I tried using the original Zim WiFi dongle but didn’t have much luck. In my experience the Wheezy distro does not support all chipsets. Here’s the one I use often:

Edimax Wifi Dongle

Also take a look a adafruit.com for other options, like this one:
LB-Link

Ok, thanks.
I hoped it was the WiFi dongle.


try this,

Hi all, I’ve uploaded a follow-up tutorial on adding custom controls to OctoPrint… OctoPi Custom Control for Zeepro Zim

Add M84 S420 for temperatures that take longer than 5 mins. This sets the inactivity timer to 7 mins (or use M84 S0 to disable the inactivity timer). If it takes longer than the inactivity timer where the stepper isn’t running (e.g. while waiting for the extruder to heat up to 220C+), Zeepro Marlin will home the head and drop the temperature to zero. Something to be aware of.

Cheers!

Thanks jpod! Hey, for some reason, my LED doesn’t turn on/ off with M1202 and M1203! and the left fan code also doesn’t work. I wonder if I have to update my zimboard firmware …do something know how would I be able to do that?

Hi Winston, the safest way is to use the stock Zeepro software on the A10 board to upgrade the image, but this is something of a pain since we’ve moved away from it. I know another way, but I cannot guarantee it will work. It may leave your board unusable…

Here’s the steps…

  1. Download the Arduino IDE from here: Arduino IDE Download
  2. Download the Zeepro copy of Marlin firmware here: Marlin Zeepro 1.1.0.15
  3. Unzip the Marlin firmware and rename the folder to “Marlin”.
  4. Open the Arduino IDE and open Marlin/Marlin.ino.
  5. Plug a USB cable from your PC into the Zim.
  6. From Tools select: Board->Arduino Mega or Mega 2560.
  7. select: Processor->ATmega2560 (Mega 2560).
  8. select: Port->COMx for you zim com port.
  9. If you would like to see the compilation as it proceeds, enable “File->Preferences->Show verbose output during: compilation”
  10. Click the compile button (called “Verify” in IDE) and make sure it compiles.
  11. Click the “Upload” button.

I tried this on a Zim and it appeared to run ok. The risk here is there is something in EEPROM requires initialization. This risk is pretty low I think, but still a possibility. If you are uncomfortable about this procedure, I’d recommend you do not try it until more testing has taken place. :stuck_out_tongue:

Cheers!

1 Like

I can figure how to have T1 temperature readings work in octopi it shows off but if i set the temp it heats, i have dual extruder.

Yes, I mentioned this in my second tutorial. Seems to work ok, but the temperature for the selected extruder always shows up as T0. I think the OctoPi may be looking for a different temperature response than the Zeepro firmware is providing. If that is the case, we may need to modify the Zeepro Marlin firmware to provide the appropriate response.

Hmm, okay I can give it a try on the extra board I have and let you guys know
:cop:

Hi Winston, before you go through that trouble, try wiggling all the connectors leading to the head. Perhaps you have a lose connection somewhere. I doubt the firmware is the problem because the LED strip lights and fan have been in there since day one, and probably always used the same commands.

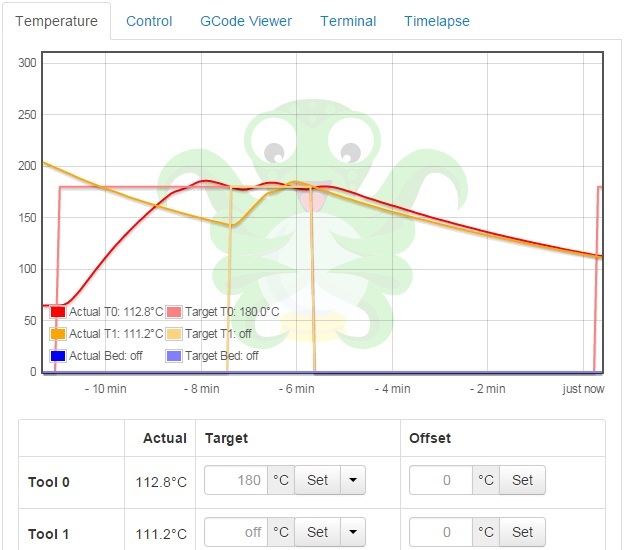
Well, I’ve figured out why OctoPrint doesn’t like to show extruder 0 and 1 temperature correctly. Marlin firmware 1.0.0.2 supports a different response format to M105 commands than the Zim Marlin 1.0.0.15 firmware provides. The OctoPrint devs mentioned it expects a temperature format like this (note additional T0 and T1 level/target)…
Send: M105
Recv: ok T:26.2 /180.0 B:0.0 /0.0 T0:26.2 /180.0 T1:62.7 /180.0 @:128 B@:0

Or like this during M109 commands (this is actually not in the newer Marlin either, but it does appear to work for OctoPrint)…
Recv: T:129.1 E:1 W:? T0:66.4 /0.0 T1:129.1 /220.0

I’ve created my own fork of the Zim Marlin firmware and made these changes. You can find this here: OctoPrint compatible Zim Marlin Firmware 1.0.0.16. I’ve tested this briefly and it appears to work ok. You will need to follow the instructions I’ve provided above to reflash your Zim board as I’m not sure how to do it without the Arduino IDE or an ISP programmer. I did this myself using the Arduino IDE and did not encounter any issues, but I have not thoroughly tested, so I would not make any promises. If you are not comfortable doing this, please do not.

Btw, I also tried just building and flashing the 1.0.0.15 version as per the instructions above, and it seems to run fine on my Zim, so there appears to be a viable path backwards as well.

For those interested in using the Zim WiFi dongle:
https://www.raspberrypi.org/forums/viewtopic.php?f=28&t=92555
And for the driver:
https://www.raspberrypi.org/forums/viewtopic.php?f=28&t=62371&hilit=rtl8188eus

I have not tested it yet, but there are some people that successfully used that to get rasperry pi and Comfast WiFi usb dongle working. Once my printing queue is empty I will resume testing it.

Tried the modified firmware and its working perfectly. Thanks

Now just need to know how to calibrate the platform… :smile:

For disabling the WiFi USB energy management settings, here is a nice article about it:

And for those who want to be sure, they can try an additional configuration:

  1. Turn off wireless power management from /etc/network/interfaces.
    sudo /etc/network/interfaces
  2. Add the following line of code (may be inserted anywhere in file):
    wireless-power off
  3. Exit and save the file
  4. Restart networking
    /etc/init.d/networking restart
  5. Confirm Power Mangement is off:
    iwconfig

You should see something like this:
Power Management:off

1 Like

Scripts for Bed Level Calibration would be a nice addition.
So far I am using the raft with two loops and layers to correctly micro-level on the fly via eyesight.
Interestingly it works very well and my print results regarding the first layer are fantastic.

By following jpod’s video I was able to use these values to setup scripts for bed level calibration

Stage leveling
G1 X75 Y75 Z0 ; for A point
G1 X30 Y145 Z0 ; for B point
G1 X122 Y145 Z0 ; for C point