Zeepro is D.E.A.D?

I copied all of the support documents to PDF just incase they do go away. You can find information about them here.

The PDF’s are kind of big due to the pictures, its on my todo list to shrink them down but I haven’t gotten around to it yet.

Hope this helps.

If it’s not too much of a time soak it would be super beneficial for the rest of this little community of zeepro zim owners if we could add a source for a ‘spare’ board; including pinout/wiring changes. Ideally, a short guide to replace the right board in the zim with a new board should any of our boards fail.

OK. I’ll see what I can get in that regard. I really think Jim is setting himself up to be the go-to guy for repairs and replacements, so I’m not really expecting him to provide me with too much in the way of hardware info, sources etc. But I’m going to ask for the Eagle or Gerber files, CAD files etc. just the same. It would really take the sting out of having orphaned hardware.

More of concern to me now are the software assets. How far does what got posted in the Zeepro GitHub repo go? Is that everything you’d need you replace the firmware and cloud services? Do we have what we need to take over where they left off?

Do we really need their missing firmware images or can we compile our own with what’s been posted? It’s nice to have the stock firmware for reference but if Zeepro.com 404’s I don’t think it will be much good. Maybe for the controller board I guess but it sounds like we can do or own modified Marlin/RAMPS firmware ourselves.

So, time for a wishlist.

1 Like

Maybe I’m getting you wrong but forget the Zeepro Cloud Slicer and go for a Raspberry Pi!
You can operate the ZIM like an open-source Reprap + if you would like to operate it via a print server (OctoPi) you can do that also: no need to have the ZIMboard (the left one in the housing) and the cloudslicer anymore.

Everything software-thing which is needed you can find in the Github repository. The only missing thing is the routing of all cables as Zeepro used different connectors and pin settings than the standard RepRap Arduino (mega + Ramps 1.4) boards.

I agree with KingMartin; using Octoprint on the pi is the way to go since Zeepro is defunct. I finished my setup the other night and I will be finally spending a good amount of time printing with my Zim this weekend to see how well i can get it to print.

I want to create one more custom control. That is to run the test strip that was printed before my print starts. I found that very useful on checking initial layer for it sticking to bed and ensuring filament flow was working well.

@Tymcode If/when parts become available. I will pick up a spare print plate and right circuit board for sure.

OctoPi seems good to me. In fact, that’s something I’ll do over fall break – cut over to OctoPi. I just didn’t want to lose any of the functionality of ZeeProShare if I don’t have to. The integrated slicers make it simpler for my family to use the thing, the webcam is nice (yes I know OctoPrint has support for it but we have to figure out how to wire it up), and I even like the model history and libraries.

The webcam works directly it has a USB connector just plug it in the USB port in the raspberry Pi and it works perfectly it won’t stop streaming like the zeeproshare interface. Have a raspberry pi 2 installed.

The options are endless after you use octoprint i modified the marlin firmware to have inductive auto leveling but waiting for the sensors to arrive to test.

For slicing i use simplify3d i like it but you could use the built in slicer in octoprint.

2 Likes

Did anyone buy the plexiglass inclosure from zeepro? if yes could they share how is it mounted to zeepro?

OK, that sounds promising.

I had vacuumed down the support content myself, both as PDF and as a site clone, when I realized that their support content is hosted on FreshDesk. Hopefully they are using the free account so it doesn’t go away, but if it does I’ll just create a free account to park it there.

Their tutorial content is hosted on YouTube.
Their source code is hosted on GitHub.
Their forum is hosted on Technobly.

In short, their site per se doesn’t host all that much content so if their hosting goes away we don’t really lose all that much. Well, aside from the stock ZeeproShare UI not working any more. :confused:

@fbinabri, The plexi enclosure isn’t mounted. It literally hangs over the top of the Zim. It’s the most disappointing, clumsy contraption I’ve ever paid real money for. The enclosure consists of 4 pieces of Plexiglas. 3 sides and one top piece all held together by 3d printed brackets.

Thank you Insomnia i guess they went with the easiest route.

I am wondering if anyone remember zim was aiming for “a 3d printer that anyone can use”?
Using octopi sounds difficult to me and maybe for others who even not know this page exist, but totally lost.

I want to use ZeeproShareUI, cloud slicer and remote access, because a person like me who is tech dummies can use 3d printer without technical knowledge.

If there is anything I can do, like hosting firmware server and slicing server, at least, I want to try.

@Opera

Trying to setup a zim cloud slicer on your own to use would honestly be harder than setting up a raspberry pi running octoprint (which is simply referred to as octopi). A 3d printer that anyone can use is great until that company goes dark. this is the situation we find ourselves in now.

I tried to pull everything in one spot that people would need here : Zim customized software/hardware quick guide It is not quite a step by step guide but it is pretty close. I can add more details to it as I have time.

I will say that. I had so many problems using the zee pro software getting things to print well. I am now printing part after part with higher quality than i ever got before simply by unplugging the left zimboard and adding the octoprint. My camera is now smooth and no longer pauses/hangs or stutters constantly. I also can get up and printing faster. I had maybe 1 or 2 good prints and 15-20 failed prints when using zee pro ui. With my new setup i’m on my 8th part and Zero failures so far. What has completed is coming out much higher quality and the parts are much more complicated. The support structure generated in Simplify3D is 10x better than what the ZeePro software generated. The support doesn’t fall over for me and is easier to remove. It leaves me with a clean part.

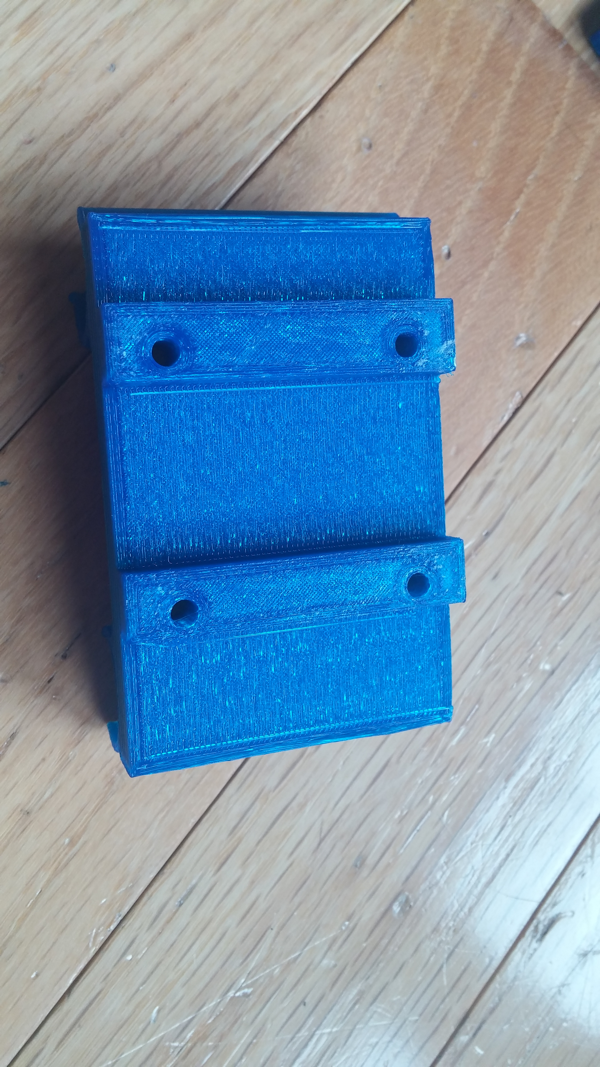
Here is a part that just completed: Hopefully the detail shows up. It’s cheap $15.00 2kg filament spool i picked up at micro center. It’s a bit shiny and reflects light so the picture quality might not reflect the quality of the part. The parts are smooth and not too rough. The support structure took 15 seconds for me to remove in 4 different spots and you can’t really tell where it was.

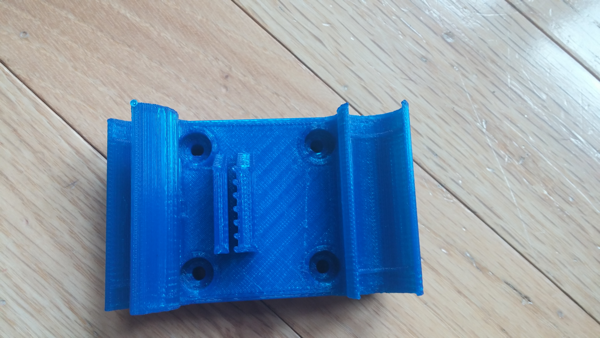
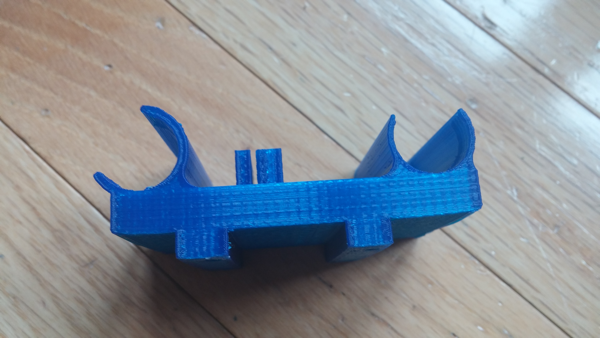
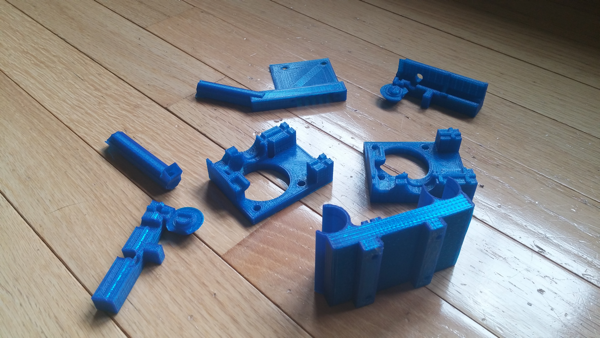
Here are the other parts I printed using zero support structure (minus the part shown above). The holes in my parts are round and clean unlike before. 2 parts contained tubes and they printed with no support and didn’t sag when the tubes were closed.

I will/would not go back at this point. I had zero printing experience prior to this Zim. It’s a bit harder to get up and running with the new setup but so worth it.

Basic outline is:
One time only:

1.Get a raspberry pi and add octoprint
2. unplug left usb board. (power & usb camera)
3. plug in usb camera and wifi device to raspberry pi and power it up.
4. unplug usb port at back of zee pro zim. plug cable from that to raspberry pi
5. connect to octoprint in browser and use interface to connect to zim.

Whenever i want to print now.

  1. power on raspberry pi
  2. power on zim (i might power raspberry pi off zim later so i can just use the Zim power switch.
  3. upload gcode using octoprint. (I use simplify 3d to generate gcode) I haven’t tried the built in slicer located in octoprint. Mainly because I haven’t created a printer profile yet.
  4. hit print

Hard part:

  1. If not computer savvy; Initial setup of octoprint with wifi adapter (you can just use USB and plug printer to Raspberry PI
  2. Unplugging the USB port. It was easy for me but i took my time and was careful removing the plug Zeepro put in.

It doesn’t get much easier to use the Zim this way. Octoprint is faster to respond and I get higher quality parts. I am not intimidated by choosing models off thingiverse and don’t look at them and think ‘thats too complicated or support structure will be impossible to remove if i do try to print it’

Like I said, I’ll try to go back and update my thread to make it even easier when I have some extra time.

@dexx0008 Thank you, and thank you very much for kind instructions.
I will try and let you know how it goes.

once again, thank you very much.

I just discovered this forum and thread… Which is bad news…
Btw, I have a question about the slicer… I never liked the Zim one, but I love the one from Simplify3d which I’m using with another fdm printer.
Can we use Simplify with the Zim? If yes, how to upload g-codes? Some advices for settings for in simplify3D?

Thanks !

Totyo, short version: Replace “computer board” inside Zim with a Raspberry Pi with OctoPrint, check here for more detailed information: OctoPi Tutorial for Zim

I did the conversion last week, works great! Using Simplify3D as the slicer, and upload the gcode files to OctoPrint.

Thank you for your replied, I just finished my conversion and my ZIM is connecting to the Pi through Octoprint.

But right now, my main question is how I load/unload filament. I followed the Joe’s great videos on youtube, but do I need to keep the original cartridge and load from the bottom or just pushing the filament to the head through the tefelon tube that I have to cut somewhere?
By discovering the internal parts of the printer, i don’t really understand why the printer has two motors for the filaments, per head…
Thanks!

In the Octopi tutorial thread you should have read the discussions, that you can choose how to operate the Zim however you like.
You can feed filament from the bottom still using the cartridges (not recommended).
You can feed from the bottom using an alternative filament drive and some spool holder of your choice.
You can feed from the top, using only the top motor, either disconnecting the down motor or leave it running empty, by cutting the PTFE tube and using the alternative spool holder.
The bottom motor is redundant, especially with those useless gear teeth. But with the extreme long PTFE tube and the cartridges and the sharp bends of the tube, the top motor alone is sometimes simply not powerful enough to transport the filament.

@3DPrintEvangelist : thank you for your help, I finally cut the Teflon tube and plugged a filament spool on the back of the pritner, it’s working nicely! :smile:

Hey
i know this was a while ago but i was wondering if you still had any contact info for jim or if his eBay store is up?
thanks so much