
hello
i am trying to put octoprint on the zimboard with no success so far
just wondering if anyone had any tips?
thanks
Zimboard for octprint
You can run this script:
https://gist.github.com/Jaesin/e563ff16df5f54a93ec2
Then this one:
https://gist.github.com/Jaesin/2b93440cadcc0fb5702f
Warning, they are still a work in progress.
hmm didn’t seem to work for me
Which part did you get stuck on @Dante_Totino? Provide as much details as you can and we’ll try to get you through it.
i ran the code and got a lot of “packet does not exist” and a few “this file is read only” and so stupidly i though i should just erase the nand of the board and install a debian weezy OS through sd but now i did that but the sd boot isn’t working and i have no way of ssh into it
any suggestions?
thanks so much by the way
I’d say probably attempt to follow this guide to restore your image http://zimsupport.zeepro.com/support/solutions/articles/5000478058-how-to-re-flash-zim-firmware
With the rooted v1.8.4 version that @Jaesin uploaded here:
https://www.dropbox.com/sh/5wtsdodzb8fx0th/AAAYxDWoiJyFBS9Xk6Kxj3-da/Sure%20OK%20-%20zim_rooted-v1.8.4-20150617.img.zip?dl=0
Then start over and when you encounter stumbling points post your logs here and we can make suggestions.
i compiled that image to sd and tried to boot with no luck i just get the green led flashing every 2 seconds forever
Are you trying to connect to the serial debugging port of the cubieboard, and you don’t see any output?
No I do not have the cable thing that I need to look through that port
Is there any other way I can view the consol?
Thank you
If you have an arduino you might be able to remove the ATMEGA328P IC and use that, however I think it’s 5V and these signals may be 3.3V? Would have to check…
Yes I do have an arduino
Would you Mind giving me some steps on how to do that?
Thank you!!
I just measured the VCC and GND of the Cubieboard debugging port and it’s 3.3V. So unless you have a level shifter I’d not recommend hooking your Arduino to the debugging port. There are a bunch of guides though on how to use it as an FTDI programmer (or USB serial converter) http://stackoverflow.com/questions/18362942/how-to-use-an-arduino-uno-as-an-ftdi-programmer
What you really want is one of these: http://www.ebay.com/itm/FT232RL-3-3V-5-5V-FTDI-USB-to-TTL-Serial-Adapter-Module-for-Arduino-Mini-Port-/141724029351?hash=item20ff6911a7:g:6qUAAOSw3ydVrhnF
and some female-female jumper wires: http://www.ebay.com/itm/40pcs-20cm-Female-To-Female-Dupont-Wire-Jumper-Cable-for-Arduino-Breadboard-/191609766828?hash=item2c9cd503ac:g:q-4AAOSwrmdTpGrw
Ok thank you I will look into it with the arduino I am also going to order the real thing
So with that will I be able to view the consol or something so that I can see what the actual board is doing? Or can I just send it commands?
Also would it be better just to get a hdmi port and solder it on then use a keyboard?
And for the USB port thing will it work with a Mac?
Check out the video link in @Jaesin’s post here for how the debugging port works: Jailbreaking ZIM after Zeepro stopped it´s services?
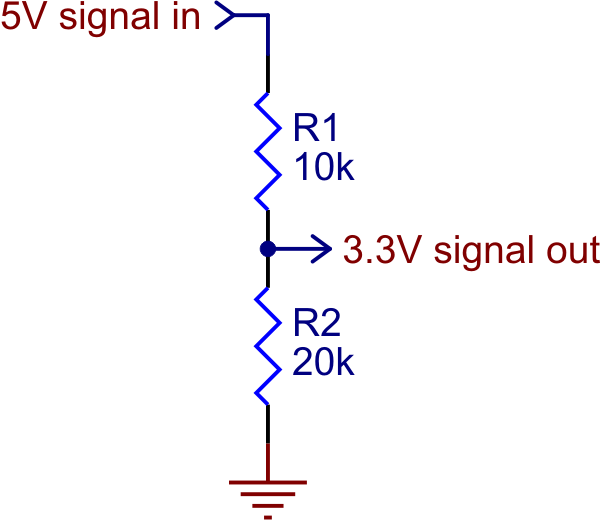
If you do try the arduino, you might be able to get away with TX from the Cubieboard going to RX of the arduino without a problem, 3.3V output to 5V input. However the 5V output of the Arduino needs to be level shifted down to 3.3V for the Cubieboard RX. You can do this with a simple resistor divider if you don’t have a level shifter IC.
The easiest way to root the zim’s cubieboard is to write the image I uploaded to a micro sd card and boot the zim with the card in it.
The image boots up then re-partitions and overwrites the data on the nand with the updated partition images.
Then just use ssh to log in as root. There is no need to use the serial cable at that point.
Look here for the image. It is titled “Sure OK - zim_rooted-v1.8.4-20150617.img.zip”
Yes I did that and ssh into it and I erased the nand on the board but then the ssh session ended and I can’t ref lash the board when I put the ad with the image in the green led just blinks twice forever
Every time that SD image boots, it should re-flash the nand. To debug, you should get this usb serial cable from SparkFun. Don’t connect the V+, just the tx, rx and ground.
1 Like
alright i ordered a serial to usb thing and it is coming today
so i plug the tx, rx, and gnd in then plug the usb unto my computer (i have a mac)
but then how do i send command and view the console
is it through terminal?
See https://www.youtube.com/watch?v=oUH7WaYsbKo. You can use the Arduino IDE to connect or use sudo cu -l /dev/cu.usbserial -s 115200 from the command line.