
Are you trying to connect to the serial debugging port of the cubieboard, and you don’t see any output?
Zimboard for octprint
No I do not have the cable thing that I need to look through that port
Is there any other way I can view the consol?
Thank you
If you have an arduino you might be able to remove the ATMEGA328P IC and use that, however I think it’s 5V and these signals may be 3.3V? Would have to check…
Yes I do have an arduino
Would you Mind giving me some steps on how to do that?
Thank you!!
I just measured the VCC and GND of the Cubieboard debugging port and it’s 3.3V. So unless you have a level shifter I’d not recommend hooking your Arduino to the debugging port. There are a bunch of guides though on how to use it as an FTDI programmer (or USB serial converter) http://stackoverflow.com/questions/18362942/how-to-use-an-arduino-uno-as-an-ftdi-programmer
What you really want is one of these: http://www.ebay.com/itm/FT232RL-3-3V-5-5V-FTDI-USB-to-TTL-Serial-Adapter-Module-for-Arduino-Mini-Port-/141724029351?hash=item20ff6911a7:g:6qUAAOSw3ydVrhnF
and some female-female jumper wires: http://www.ebay.com/itm/40pcs-20cm-Female-To-Female-Dupont-Wire-Jumper-Cable-for-Arduino-Breadboard-/191609766828?hash=item2c9cd503ac:g:q-4AAOSwrmdTpGrw
Ok thank you I will look into it with the arduino I am also going to order the real thing
So with that will I be able to view the consol or something so that I can see what the actual board is doing? Or can I just send it commands?
Also would it be better just to get a hdmi port and solder it on then use a keyboard?
And for the USB port thing will it work with a Mac?
Check out the video link in @Jaesin’s post here for how the debugging port works: Jailbreaking ZIM after Zeepro stopped it´s services?
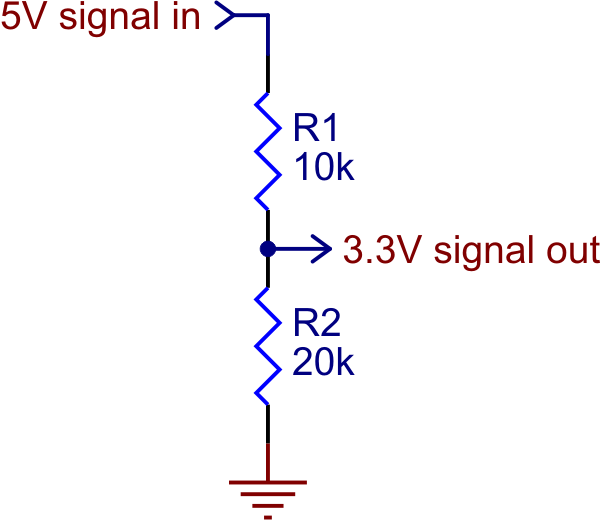
If you do try the arduino, you might be able to get away with TX from the Cubieboard going to RX of the arduino without a problem, 3.3V output to 5V input. However the 5V output of the Arduino needs to be level shifted down to 3.3V for the Cubieboard RX. You can do this with a simple resistor divider if you don’t have a level shifter IC.
The easiest way to root the zim’s cubieboard is to write the image I uploaded to a micro sd card and boot the zim with the card in it.
The image boots up then re-partitions and overwrites the data on the nand with the updated partition images.
Then just use ssh to log in as root. There is no need to use the serial cable at that point.
Look here for the image. It is titled “Sure OK - zim_rooted-v1.8.4-20150617.img.zip”
Yes I did that and ssh into it and I erased the nand on the board but then the ssh session ended and I can’t ref lash the board when I put the ad with the image in the green led just blinks twice forever
Every time that SD image boots, it should re-flash the nand. To debug, you should get this usb serial cable from SparkFun. Don’t connect the V+, just the tx, rx and ground.
1 Like
alright i ordered a serial to usb thing and it is coming today
so i plug the tx, rx, and gnd in then plug the usb unto my computer (i have a mac)
but then how do i send command and view the console
is it through terminal?
See https://www.youtube.com/watch?v=oUH7WaYsbKo. You can use the Arduino IDE to connect or use sudo cu -l /dev/cu.usbserial -s 115200 from the command line.
ok got it
i turned it on and got this
�HELLO! BOOT0 is starting!
boot0 version : 2.0.0�
read dram para.
dram driver version: 1.15
dram size =1024MB
0xffffffff
super_standby_flag = 0
Succeed in opening nand flash.
block from 2 to 6
deal block 2
Succeed in reading Boot1 file head.
The size of Boot1 is 0x00068000.
The file stored in 0x00000000 of block 2 is perfect.
Check is correct.
Ready to disable icache.
Succeed in loading Boot1.
Jump to Boot1.
[ 0.148] boot1 version : 2.0.0
[ 0.148] script installed early ok
[ 0.149] pmu type = 3
[ 0.253] bat vol = 0 mv
[ 0.266] axi:ahb:apb=4:2:2
[ 0.266] set dcdc2=1400mv, clock=912M successed
[ 0.269] key
[ 0.281] no key found
[ 0.281] flash init start
[ 0.281] NB1 : enter NFB_Init
[ 0.284] NB1 : enter phy init
[ 0.287] [NAND] nand driver(b) version: 0x0x00000002, 0x0x00000012, data: 0x20130627
[ 0.295] get the good blk ratio from hwscan : 944
[ 0.300] NB1 : nand phy init ok
[ 0.342] get mbr error
[ 0.342] NB1 : init ok
[ 0.342] flash init finish
[ 0.346] mbr magic is not correct
[ 0.348] fs init fail
[ 0.351] fs init fail, jump to fe
ok i made a bootable sd and turned on and this is what i got
any suggestions?
sorry was too big to upload
basically it goes through boot then repeats the same thing over and over
'https://docs.google.com/document/d/1zUrnnW88-X7-T_oLOq2-jAG-GArs1jYoaWvnupyxnxI/edit?usp=sharing
I haven’t been on here in a while. Just been super busy with work. @Dante_Totino did you get your Zim flashed properly yet?
i actually just decided to switch to a rpi thank you though
1 Like
It’s cheap and well supported  Good choice!
i deleted the original firmware that was on the sd card the aim came with what do i do 
- Keep calm, take a deep breath and relax.
- Download @Jaesin ´s rooted Zeepro Firmware HERE if you´d like to stay as genuine as possible OR
- Download @waffles “Octoprintified” software HERE if you want to have maximum control
No matter which you choose, read the topics as there are many hints for proper installation OR - Or buy a Raspberry Pi and download octoprint for Raspberry Pi HERE. You´ll have to tinker around a bit with the cover of the USB Port at the back of your ZIM, but I already removed two of them without problems.
The SD-Card in the cubieboard contains no vital data, but it is necessary to have a card inserted for the cubie to run, as it saves your uploaded gcodes and some other files there. It should work if you insert some FAT32 formatted SD-Card.
1 Like