Jpod, did you find that your latest Marlin Firmware resolved most of your blobbing/pausing issues? Also are the directions above still the best way to go about updating the firmware now that the A10 board is disconnected? Thanks for the help!
OctoPi Tutorial for Zim
It resolved my pausing issue (short pauses due to lots of short moves in the gcode). Part of my blobbing turned out to be retract settings and random startpoints (zits as they call them). I resolved this with the simplify3d start location option, which creates a seam but no blobs.
Yes, the instructions to upload using the Arduino IDE are still the right way to do it. The A10 board wasn’t really ever in the picture.
Things are definitely looking better and better 
Came home, installed jpod’s firmware and wow, so much better!
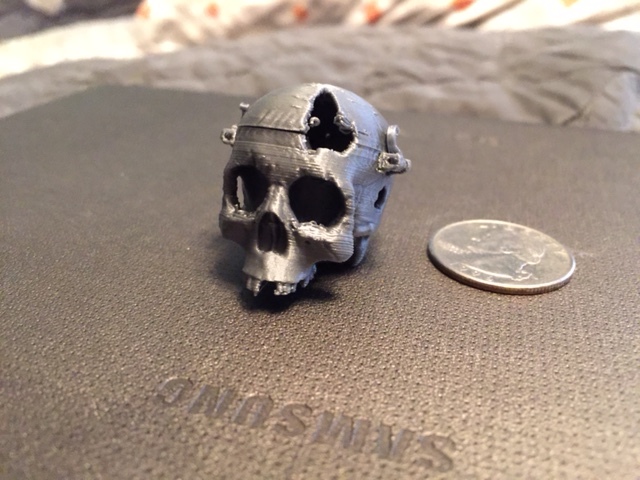
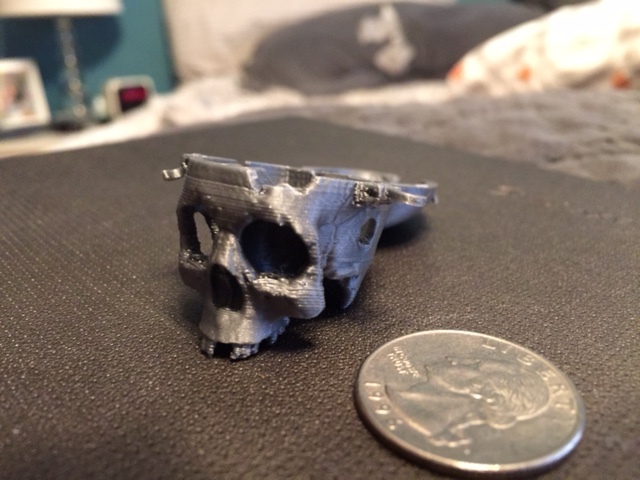
52 minutes 36 second print, no supports, scaled down Skull Box
Gotta slow things down a bit but having a ton of fun. Thank you all for the great advice and help!
1 Like
I will be attempting this OctoPi conversion tonight, wish me luck!
Good luck! Let us know if you have any troubles, I’m sure we can work through them. 
This conversion went so well, I can hardly believe it! I have more feedback and questions when I get some rest 
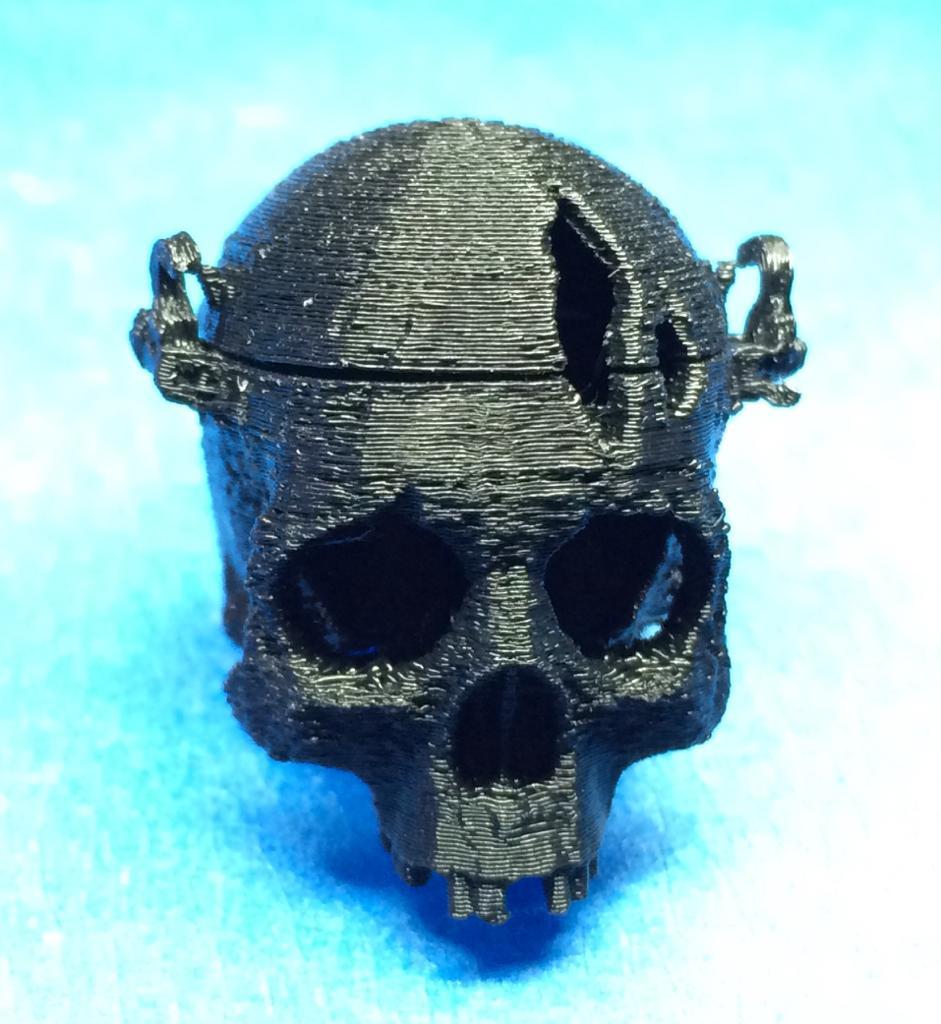
I printed the skullbox at 40% with supports at 69 minutes and it turned out pretty good. 220C PLA. The hooks were kind of too small to break free without breaking a bit of the mount, but the head hinged fine.
Ok so here’s my OctoPi conversion notes:
The first thing I did was test my Zim once last time with Zeepro firmware. When I powered it on it got an update to 1.8.3. I loaded a very small test piece that should normally load and slice very quickly. The machine was pretty laggy even just loading the part and then very laggy to slice a tiny little piece (smaller than a toothpick), but it did work and the part printed as it always did before. My theory on this is that Zeepro is possibly using a scalable cloud platform like Heroku or Cloud9 to run their cloud slicer, and now that they are defunct they turned off all of the extra dynos (CPUs and RAM) that you’d normally pay big bucks for each month and just have it still running on the free tier (which will work but be really slow). If that’s what happened, kudos to them for not completely shutting it down and rending the Zim utterly useless.
So I started by trying to unload my filament (probably didn’t need to do this but I thought I might need the room or soemthing… turned out to be a good learning experience) the zeepro way and the left cartridge worked fine but the right cartridge’s filament was broken down by the base so I had to get crazy with it to unload this side. Long story short, as part of this work I found that the filament gets caught as it enters the teflon tube right past the microswitch at the cartridge bay. Something it probably always did in the past but I never noticed. So now I figure it’s a good idea to manually shove about 6-12 inches of filament into the tube to make sure it’s gets past this snag, and then push the cartridge in. Pretty soon I will replace these with the new bottom loader assembly.
Once the filament was out, I looked for a document that had the screws to remove for the baseplate so that I could get more room to pull cables off of the cubieboard which was getting replaced by the RasPi2 and get access to the zimboard. I’ll save you the trouble, here’s the pic:

Once the bottom tray was down, I decided to work on getting access to the USB connector on the zimboard. I figured for sure I would have to desolder one from my Arduino to put on here. Before I even tried to pry mine off, I unscrewed the zimboard from the baseplate. Bad idea. The screws and spacers that hold the zimboard down are a PITA and in my opinion a bad design, easy enough to take apart… hard to replace. Once I got it off though, as I pulled the zimboard away from the backplane, the USB connector cover just fell off. I was shocked, it wasn’t glued in at all! I got one of the earlier units so they might have not started gluing these yet… but a win nonetheless. I removed the cubieboard and saved all of the hardware for it.
Now it was time to write the octopi image to the flash card. I ended up getting this complete starter kit from amazon, and everything was great except for the power supply, which wasn’t not UL approved and does not snap into the USB connector on the Pi like all of my other micro usb cables do… it’s just a loose unsettling feeling but it works (for now)… I’m going to replace it with a proper power supply.
I used Apple Pi Baker to write the image using my Mac, and it worked great.
There were a few stumbling points in the tutorial video, like I did not have a ~/etc/network/interfaces path, but the file can be edited via an absolute path by sudo nano /etc/network/interfaces from anywhere. I edited the interfaces file with my home Wi-Fi credentials and it connected right away. Something to note is if you forget your Pi’s IP address, you can look in your router at connected wireless devices and it should come up with a name of octopi.
I didn’t see a reason why I needed the ethernet cable plugged in, but I did have one plugged in. You could probably omit that step?
You can SSH into the PI super easily with a Mac:
ssh pi@192.168.1.x (whatever your Pi’s IP address) was, then give it the “raspberry” password.
My Octopi was at version 1.2.2 and needed to update to v1.2.6, but it kept failing to update for some reason. So I SSH’d into the Pi, and cd OctoPrint/, from here you can simply run git fetch && git checkout 1.2.6 and this will pull the tags and checkout the github commit tagged as version 1.2.6 ( which was the current newest version of OctoPrint ). After rebooting the Pi and loading up OctoPrint, it was still v1.2.2… but now running the Software Update command worked and I ended up with v1.2.6.
I went straight for updating my zimboard firmware to jpod’s modified firmware, which was super easy. I would suggest renaming the Marlin.ino to marlin-zeepro.ino so there is just one less step to do when you have to rename the folder to marlin. Since we are clearly diverged from the original marlin firmware at this point, there is little reason to keep that file named simply Marlin.ino  Great work on digging into this firmware jpod! I see references to driving an LCD from the zimboard, and I’m wondering if that’s useful and what is displayed on it.
I went through jpod’s tutorials on how to add simple fixes to the default gantry speeds and z-axis inversion and the camera worked perfectly. Another thing to note is that the camera is WAY LESS laggy than when running on the cubieboard. It’s almost real-time now verses a 30 second lag!! I went through the advanced scripting tutorial and created the Lights on/off buttons and load/unloadFilament scripts. I used Filezilla on windows with the SFTP protocol (port 22) and was able to load these files easily. When I tried the loadFilament script, it didn’t load nearly long enough to run filament all of the way up into the extruder. I found through manual control that 1400mm was about right for both cartridges, so I’ll have to edit this in the script once I figure out where to put the right commands.
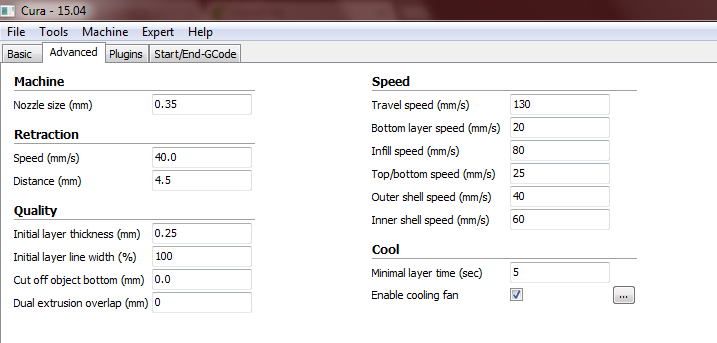
Once I was ready to print, I was hung up by the fact that I could not do onboard slicing before I uploaded a Cura profile. Only recently did @J_Schmidt add screenshots of his profile, which I tried to initially re-create with the lastest Cura on Mac… but everything was looking too different, so I downloaded the exact version he used for Windows and was able to get something going. That said, I wish a file was available!!.. so here’s mine:
T0 and T1
T0 only
T1 only
About this Cura profile, it heats up BOTH extruders regardlessly, and I cannot find a way to select tool0 or tool1 dynamically. Is this something we need to create individual profiles for? I’d love to see your profiles for this if you guys have figured this out. BTW, on my Zim, T0 is the right extruder, and T1 is the left extruder. Not sure how you guys have it, but my LEFT cartridge feeds the LEFT extruder (which we all know is driven by the LEFT lower and RIGHT upper steppers). Not sure if this is different from what you guys have, but I might have done that to make it more intuitive when I had all of my teflon tubes removed.
I didn’t have any issues with my 69 minute long print timing out (see skull in previous post). This is really fantastic and I couldn’t have asked for a better end result. Thanks @jpod for putting the tutorials together, and thanks everyone for contributing to this epic and necessary collaboration! It’s really quite thrilling to be in control again of our printers.
Also figured out how to change the background image on the graph… the octoprint octopus is cute and all, but he more so creeps me out. This is the image you need to change:
./home/pi/oprint/lib/python2.7/site-packages/OctoPrint-1.2.6-py2.7.egg/octoprint/static/img/graph-background.png
I like to just keep this file in my home/pi directory so after new updates I can run this easy command without having to SFTP the file every time:
cp graph-background.png oprint/lib/python2.7/site-packages/OctoPrint-1.2.8-py2.7.egg/octoprint/static/img/graph-background.png
and after running this command and refreshing your web browser you’ll see it:
sudo service octoprint restart
Time to get designing and printing a simple hub for CD/DVD mousetrap car wheels for an upcoming meetup I’m doing for the kids 

1 Like
well guys i finally got it to work. i re made an entire cura profile and set my timeout time to 60k seconds. and i got a great print out of it with no stops, pauses, over temp, dropping temp, or feeding issues. i used these settings over on the “speed” section instead of the other settings posted. that plus keeping the temp at 210 for PLA and 100% infill. thank you guys for putting up with my noobness and maybe my settings may help someone esle. oh and can you tell me how i can make the head home and drop the bed all the way down after a print. that would be much appreciated.
Try:
M2001 ; Zeepro’s “End Print” (drops platform, centers head, retracts filament slightly, and turns off heat)
G28 X Y ; home x and y axis (to zero head instead of centering from above command)
BTW I created profiles that don’t attempt to heat up both extruders and they still both heat up. I’m also completely stumped at what exactly picks the T0 or T1 tool for the print. When I slice I figured that the cura profile would embed the right GCODE command for T0 or T1 based on the profile I use… but it doesn’t seem to do it. Anyone figure this out?
EDIT: Just added all 3 profiles I’m using in the post above.
EDIT2: Hmm, it seems to use a different start script in the GCO file than the one in the profile I selected… here’s the profile:
start.gcode = ;Set hotends and bed to their temperatures and continue

	M140 S{print_bed_temperature}  ;set bed temperature, no wait
	;M104 T0 S{print_temperature}   ;set EX0 temperature, no wait
	M104 T1 S{print_temperature2}  ;set EX1 temperature, no wait
	;set temps again and wait
	M190 S{print_bed_temperature}  ;set bed temp and wait
	;M109 T0 S{print_temperature}   ;set EX0 temp and wait
	M109 T1 S{print_temperature2}  ;set EX1 temp and wait

	G17  ;set plane to XY (not really necessary...)
	G21  ;set units to mm (or G20 for inches)
	G90  ;set to absolute positioning (or G91 for incremental/relative)

	M82  ;set extruder to absolute mode (or M83 for relative)
	M107 ;fan off
	M203 X10000 Y10000 Z600 E250 ;set max feedrates

	G28 ;home all Axes

	G1 Z15.0 F(travel_speed)

	T1                      ;Switch to the 2nd extruder
	G92 E0                  ;zero the extruded length
	G1 F200 E10             ;extrude 10mm of feed stock
	G92 E0                  ;zero the extruded length again
	G1 F200 E-{retraction_dual_amount}

	T0                      ;Switch to the first extruder
	G92 E0                  ;zero the extruded length
	G1 F200 E10             ;extrude 10mm of feed stock
	G92 E0                  ;zero the extruded length again
	G1 F{travel_speed}
And here’s the GCO file:
;Generated from cd-dvd-bearing-hub2.stl 79c3b89c6a3aac442a0bd4f02a865265f03cef73
;Generated with Cura_SteamEngine 15.04
M104 T1 S200.0
M109 T0 S200.0
M109 T1 S200.0
T0
;Sliced at: Sun 13-09-2015 06:12:32
;Basic settings: Layer height: 0.15 Walls: 0.3 Fill: 20
;M190 S70 ;Uncomment to add your own bed temperature line
;M104 S200 ;Uncomment to add your own temperature line
;M109 T1 S?print_temperature2? ;Uncomment to add your own temperature line
;M109 T0 S200 ;Uncomment to add your own temperature line
G21        ;metric values
G90        ;absolute positioning
M107       ;start with the fan off

G28 X0 Y0  ;move X/Y to min endstops
G28 Z0     ;move Z to min endstops

G1 Z15.0 F7200 ;move the platform down 15mm

T1                      ;Switch to the 2nd extruder
G92 E0                  ;zero the extruded length
G1 F200 E10             ;extrude 10mm of feed stock
G92 E0                  ;zero the extruded length again
G1 F200 E-16

T0                      ;Switch to the first extruder
G92 E0                  ;zero the extruded length
G1 F200 E10             ;extrude 10mm of feed stock
G92 E0                  ;zero the extruded length again
G1 F7200
;Put printing message on LCD screen
M117 Printing...
I’m not familiar with Cura, but simplify3d just lets you pick the tool(s) to use for the profile. I had to setup 3 profiles: one for left (T1), one for right (T0), and one for both.
Simplify3D looks nice, but it’s another $140 I’d like to keep for the moment 
Got it to use T1 with this script.
I just tried using Cura to generate the GCODE and then doing a little manual editing it started out showing both temps rising perfectly at the same time and then after they both heated up the T0 temps dropped back to 55C. It appears as though Octoprint was fooled into thinking T0 was rising, at least with this print (not sure about previous ones). Here’s the start profile:
;M140 S70  ;set bed temperature, no wait
M104 T0 S0   ;set EX0 temperature, no wait
M104 T1 S200  ;set EX1 temperature, no wait
;set temps again and wait
;M190 S70  ;set bed temp and wait
;M109 T0 S0   ;set EX0 temp and wait
M109 T1 S200  ;set EX1 temp and wait
G17  ;set plane to XY (not really necessary...)
G21  ;set units to mm (or G20 for inches)
G90  ;set to absolute positioning (or G91 for incremental/relative)
M82  ;set extruder to absolute mode (or M83 for relative)
M107 ;fan off
M203 X10000 Y10000 Z600 E250 ;set max feedrates
G28 ;home all Axes
G1 Z15.0 F(travel_speed)
T1                      ;Switch to the 2nd extruder
G92 E0                  ;zero the extruded length
G1 F200 E10             ;extrude 10mm of feed stock
G92 E0                  ;zero the extruded length again
;G1 F200 E-16
;T0                      ;Switch to the first extruder
;G92 E0                  ;zero the extruded length
;G1 F200 E10             ;extrude 10mm of feed stock
;G92 E0                  ;zero the extruded length again
G1 F7200
@BDub: I think the fact that cura always heats up both extruders was my fault:
I Posted the lines from my 2-extruders-profile:
M104 T0 S… and M104 T1 S…
Of course if you want to print with one extruder only, this makes no sense. You can delete the T1 Line if you only use the right extruder or the line with T0 if you want to use the left one.
Unfortunately, it seems that you have to make one profile for every single configuration in cura if you want to easily print your g-code.
You need a profile for a fast print, for a medium print and for a detailed print, as well as a super-high quality print, and all of them for PLA and ABS. Also you might need three profiles for dual-extruder prints in several qualities, and in different materials…
You see that it would be a bad idea to slice everything with the onboard slicer.
Although the new RasPi2 B ist really fast, slicing on PC/MAC is faster and way more comfortable.
So I decided for myself to have three standard-profiles in Octo for a quick and dirty print (and to show my friends that I can print from my phone  ), and everything else… well, I slice on my computer with slic3r or Cura.
BTW: In the original ZIM software, you had the same problems. The only advantage was that you could modify your settings in the UI. (BUT: There were only the easy settings, no options for experts)
@all: You can delete the G17 line… Octoprint sais that the command is unknown… (G17= set plane to XY)
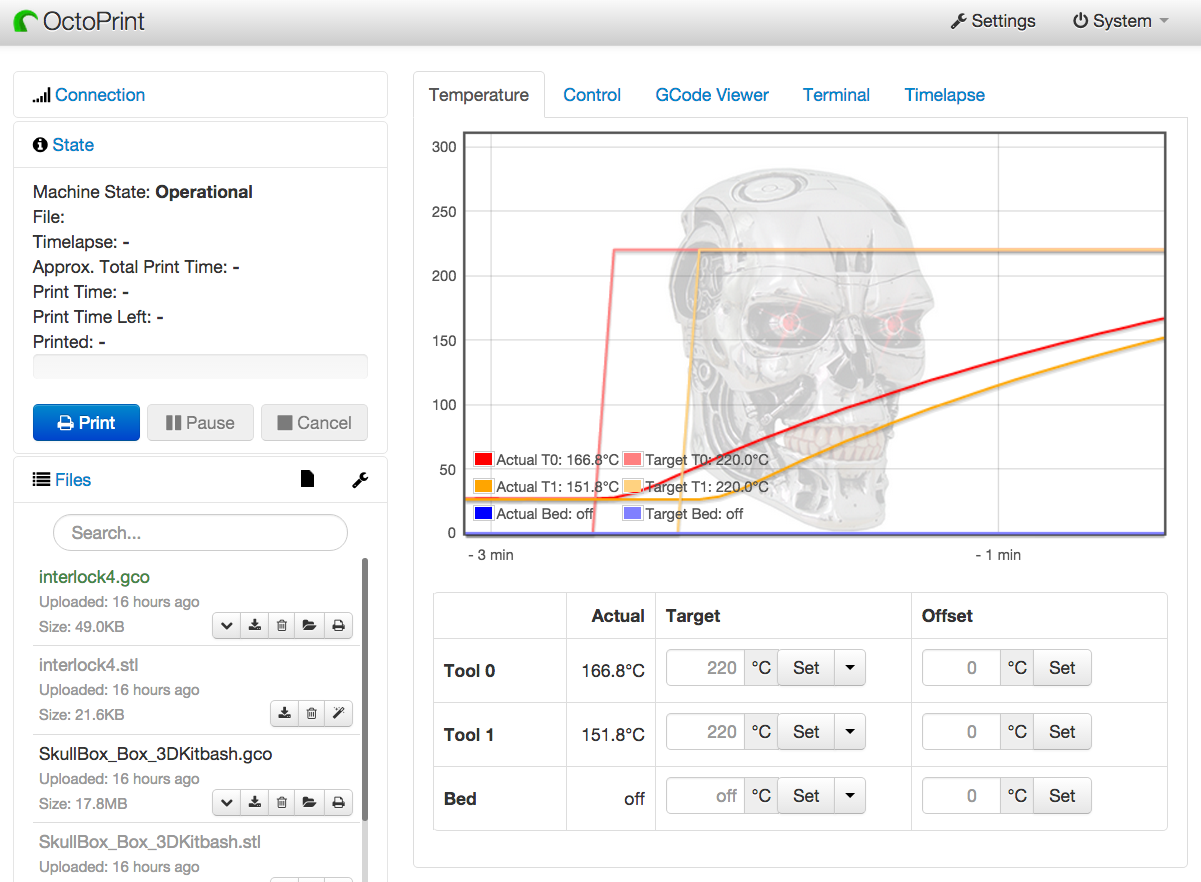
@J_Schmidt right I did catch that in the script, but even after I modified it to only heat one extruder, it reports that the other one is heating as well (which it’s not). Here’s what the temp tab looks like as it’s heating:

And then in the console, you can see it’s receiving 30.5 for T0, not 155.4.
Recv: T:153.8 E:1 W:? T0:30.5 /0.0 T1:153.8 /200.0 B:0.0 /0.0
Recv: T:154.6 E:1 W:? T0:30.5 /0.0 T1:154.6 /200.0 B:0.0 /0.0
Recv: T:155.4 E:1 W:? T0:30.5 /0.0 T1:155.4 /200.0 B:0.0 /0.0
Recv: T:156.3 E:1 W:? T0:30.5 /0.0 T1:156.3 /200.0 B:0.0 /0.0
So maybe this is an Octoprint bug?
To me the on-board slicing seems really fast, and I’d prefer to use one less software package step before I go to the printer if possible. But the profiles don’t even seem to be loading properly on the printer anyway. Currently I’m creating in sketchup, exporting as STL ascii, opening in netfabb basic to check for errors and automatically fix them if so export form there if necessary, then I would have to now open in Cura to slice. I do like the view in Cura though… so maybe once I get on to some larger prints with weird support structures it will be more advantageous to preview the whole print in Cura.
Also unrelated I printed 4x of my CD hubs and the print got paused after about an hour and I’m not sure why (might have been when I tried checking on it from my back yard while I was mowing the lawn  but I didn’t realize it was just paused and I ripped the half baked hubs off of the platform to check my filament. Doah!
  Wish I would have got to save the day with the resume button… rats.
@BDub, I believe this is a bug in my new Marlin responses not matching what OctoPrint expects. It’s better than it was, but still not right, because I’ve seen the same thing where temp 1 tracks temp 0 even though the terminal show temps correctly. I need to find out how to properly format the response for OctoPrint and fix Marlin to do that. The whole dual extruder active tool thing is sortof a hack on my opinion, made to fit CNC where there is one active tool. On a printer, you can really have 2 active tools, but Marlin gcode doesn’t account for this.
1 Like
Are you sure? I think it´s more like
T0 active … print curve, T1 active … print curve, T0 active… and so on.
I don´t think that the G-Code nor the printer ist capable to print with two printheads at the same time. Due the fact that the offset between the heads is fixed, this would also make no sense.
Sure, the use case is limited, but some people use both extruders simultaneously to produce multiple copies of the same part. This is possible on any printer based on the Makerbot Replicator or Sailfish firmware I believe, like the Flash Forge and other copies. It’s Called Dualstrusion
I guess what I really don’t like is reporting T for active temperature for the “active” extruder when there is actually T1 and T0 temperature data to graph and track (e.g.they are both active, at least as far as temperature is concerned, so what is '‘T’ really doing for us there). Having to pick one as active does things like make OctoPrint track the wrong one as BDub reported, until we figure out the correct format to send. This is why the original Zeepro Marlin didn’t work so well with OctoPrint. Mine doesn’t either in some cases. I looked up my mods from the stock Marlin distribution and overlayed them on the Zeepro firmware, but perhaps I missed something (or OctoPrint doesn’t work with Marlin and dual extrusion). I’ll circle back on it and make it work when time allows (maybe tonight  ).
).
1 Like
@jpod Here’s some help:
http://docs.octoprint.org/en/master/configuration/config_yaml.html
# If enabled, reports the set target temperatures as separate messages from the firmware
    #
    # True:  > M109 S220.0
    #        < TargetExtr0:220.0
    #        < ok
    #        > M105
    #        < ok T0:34.3 T1:23.5 B:43.2
    # False: > M109 S220.0
    #        < ok
    #        > M105
    #        < ok T0:34.3/220.0 T1:23.5/0.0 B:43.2/0.0
    repetierStyleTargetTemperature: false

    # If enabled, reports the first extruder in M105 responses as T instead of T0
    #
    # True:  > M105
    #        < ok T:34.3/0.0 T1:23.5/0.0 B:43.2/0.0
    # False: > M105
    #        < ok T0:34.3/0.0 T1:23.5/0.0 B:43.2/0.0
    smoothieTemperatureReporting: false
##Reprap format
http://reprap.org/wiki/G-code#M105:_Get_Extruder_Temperature
##Code that parses the response in OctoPrint:
##Talk about if OctoPrint is supporting a dual extruder, how to handle the T vs T0 vs T1:
Maybe as a guess, I would say the first active extruder temp represented as just T, needs to also be followed with a target temp /200.0
Recv: T:155.4 E:1 W:? T0:30.5 /0.0 T1:155.4 /200.0 B:0.0 /0.0
vs.
Recv: T:155.4 /200.0 E:1 W:? T0:30.5 /0.0 T1:155.4 /200.0 B:0.0 /0.0
Excellent! Thanks for the info, I’ll give it a try tonight.
1 Like
Interesting to note as well, before a print is started the response is slightly different:
Send: M105
Recv: ok T:25.7 /0.0 B:0.0 /0.0 T0:25.7 /0.0 T1:25.9 /0.0 @:0 B@:0
and after (this is not the M105 but the M109 set and wait command):
Send: N4 M109 T1 S200*43
Recv: T:153.8 E:1 W:? T0:30.5 /0.0 T1:153.8 /200.0 B:0.0 /0.0
Once it reaches temp it’s not waiting any more and starts sending M105’s again (last 4 lines here)… which it apparently knows how to process just fine:
Recv: T:199.6 E:1 W:8 T0:36.2 /0.0 T1:199.6 /200.0 B:0.0 /0.0
Recv: T:200.1 E:1 W:7 T0:36.2 /0.0 T1:200.1 /200.0 B:0.0 /0.0
Recv: T:200.5 E:1 W:6 T0:36.2 /0.0 T1:200.5 /200.0 B:0.0 /0.0
Recv: T:201.0 E:1 W:5 T0:36.3 /0.0 T1:201.0 /200.0 B:0.0 /0.0
Recv: T:201.5 E:1 W:4 T0:36.3 /0.0 T1:201.5 /200.0 B:0.0 /0.0
Recv: T:202.0 E:1 W:3 T0:36.4 /0.0 T1:202.0 /200.0 B:0.0 /0.0
Recv: T:202.5 E:1 W:2 T0:36.6 /0.0 T1:202.5 /200.0 B:0.0 /0.0
Recv: T:203.0 E:1 W:1 T0:36.7 /0.0 T1:203.0 /200.0 B:0.0 /0.0
Recv: T:203.2 E:1 W:0 T0:36.6 /0.0 T1:203.2 /200.0 B:0.0 /0.0
Recv:
Recv: ok
Send: N5 G17*26
Recv: Unknown command: "N5 G17*26"
Recv:
Recv: ok
Send: N6 G21*28
Recv:
Recv: ok
Send: N7 G90*23
Recv:
Recv: ok
Send: N8 M82*17
Recv:
Recv: ok
Send: N9 M107*44
Recv:
Recv: ok
Send: N10 M203 X10000 Y10000 Z600 E250*12
Recv:
Recv: ok
Send: N11 G28*35
Recv:
Recv: ok
Send: N12 G1 Z15.0 F(travel_speed)*60
Recv: ok
Send: N13 T1*9
Recv: echo:Active Extruder: 1
Recv:
Recv: ok
Send: N14 G92 E0*114
Recv:
Recv: ok
Send: N15 G1 F200 E10*44
Recv: ok
Send: N16 G92 E0*112
Recv:
Recv: ok
Send: N17 G1 F200 E-16*5
Recv: ok
Send: N18 G1 F7200*114
Recv: ok
Send: N19 M107*29
Recv:
Recv: ok
Send: N20 G0 F7200 X49.671 Y49.658 Z0.250*33
Recv: ok
Send: N21 G0 X49.347 Y50.075*17
Recv: ok
Send: N22 G1 F1800 X49.671 Y49.658 E0.01647*50
Recv: ok
Send: N23 G1 X52.620 Y47.393 E0.13241*95
Recv: ok
Send: N24 G1 X56.065 Y45.966 E0.24868*92
Recv: ok
Send: N25 G1 X59.759 Y45.480 E0.36486*80
Recv: ok
Send: N26 G1 X63.455 Y45.966 E0.48110*83
Recv: ok
Send: N27 G1 X66.901 Y47.392 E0.59739*85
Recv: ok
Send: N28 G1 X69.857 Y49.662 E0.71360*81
Recv: ok
Send: N29 G1 X72.128 Y52.620 E0.82988*87
Recv: ok
Send: N30 G1 X73.555 Y56.065 E0.94615*95
Recv: ok
Send: N31 G1 X74.041 Y59.761 E1.06239*85
Recv: ok
Send: N32 G1 X73.622 Y62.948 E1.16262*80
Recv: ok
Send: N33 G1 X73.547 Y63.470 E1.17907*95
Recv: ok
Send: N34 G1 X72.328 Y66.417 E1.27851*83
Recv: ok
Send: N35 M105*17
Recv: ok T:200.0 /200.0 B:0.0 /0.0 T0:37.9 /0.0 T1:200.0 /200.0 @:0 B@:0
Send: N36 M105*18
Recv: ok T:200.0 /200.0 B:0.0 /0.0 T0:37.9 /0.0 T1:200.0 /200.0 @:0 B@:0
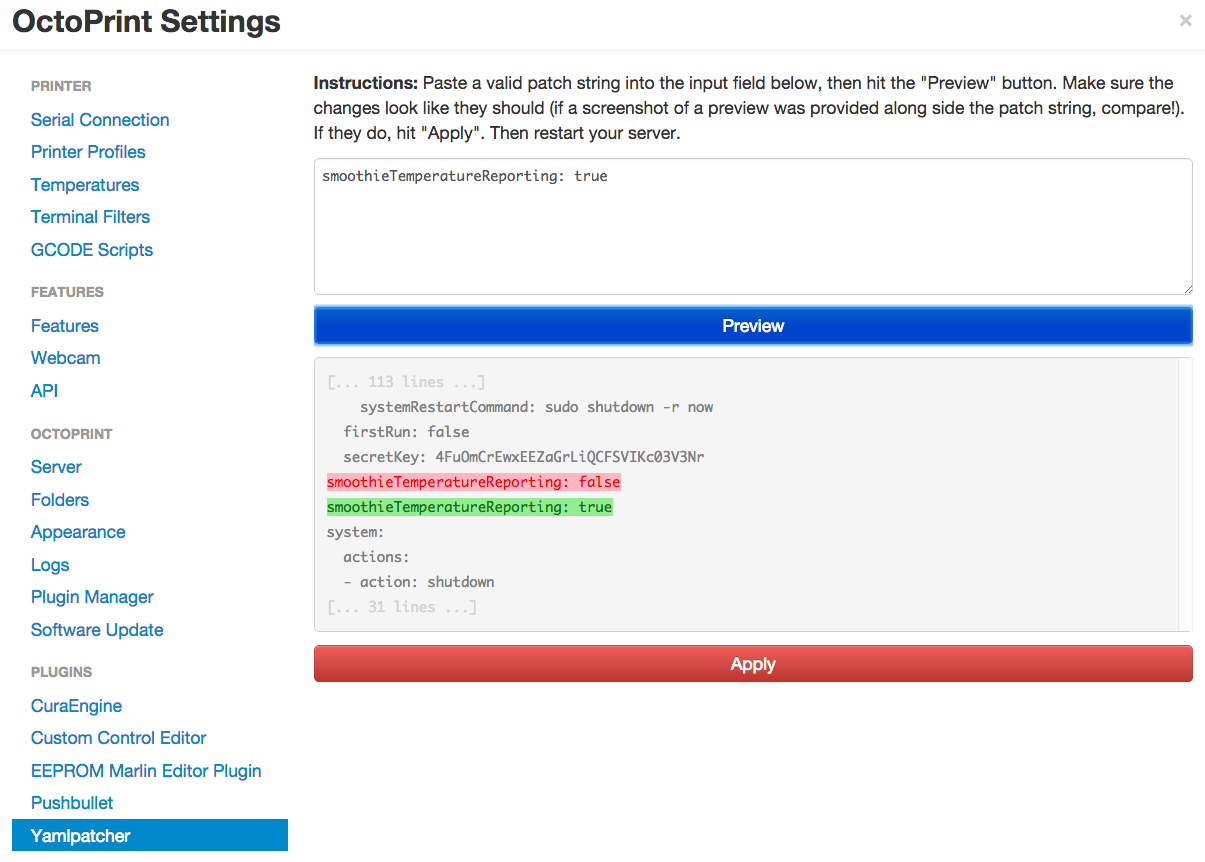
I tried installing the YamlPatcher plugin and applying this option with no change: