
I am having a problem with the extruder jamming a lot. The printer was working perfectly fine until last week. I have it set up bypassing the cartridge and feeding directly into the extruder but everything else is stock. Recently it has started sporadically extruding. By this I mean that it lays down the first layer and then whatever it choses after that. I have been unable to get a complete print. I did disassemble the extruder and put it back but I am still having this issue. I think that the filament is jamming and then unjamming itself. Currently my printer is unusable. Any advice on how to fix it?
Jamming jamming and some more jamming
How exactly is it jamming? Does it spool all up in the extruder heatsink or just the nozzle is jamming? What temps and material are you using?
Since you converted to not using the cartridges, do you still have those lower cart steppers plugged in? If not, did you recalibrate the E0, E1 stepper motor current limit on the zimboard?
Did you change how you are slicing since last week? Maybe take a video of it in operation so we can have a look, if that’s not too much trouble. Sometimes just by listening to the sound of it, we might be able know if something’s wrong.
What happens if you manually heat up and extrude some filament?
Does the filament move free? Does it look normal? Is there a clicking sound?
My guess would be a partial block of nozzle.
If thats the case look in the forum, where I posted how to unclog the nozzle.
Short summary is get a 0.3mm and 0.35mm and 0.4mm drill, heat nozzle up, and first use the pull method to try to remove all filament from the top and next drill the nozzle free of everything inside.
Flush the nozzle afterwards with manual extrude.
The filament simply stops being pulled in. It does not spool into the extruder heatsink. I am running at 180-190 (depending on the print) using PLA. I converted to not use cartridges but the lower stepper sits there and spins in place, I have not removed it. When the print is heated, I can push filament through by pushing down as it enters the extruder.
How do you manually extrude filament?
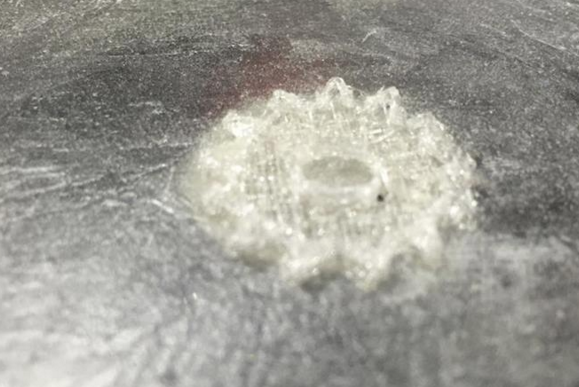
Here is a gear that I tried to print
Innocent question. Does your fan works ?
if the fan doesn’t work the extruder start heating and the gear start ripping on the filament and no more extrusion
You should verify if right fan works and during a print touch the extruder to evaluate the temperature. If you cannot hold your finger on the extruder. this means that you have a over heat on the extruder bloc.
during these test DO NOT USE the left fan.
The RIGHT fan is working but now that you ask, the LEFT fan is not spinning. The extruder block is at a fine temperature. When I get home, I am going to try drilling out the nozzle with a .3mm drill
That is correct. Right fan must always be on, its for the extruder. Left fan is optional and only for cooling specific printed PLA parts.
Heat the extruder to working temp and than drill the nozzle. Use plastic gloves and be very gentle with that drill, because hot plastic really hurts a lot and the drill very easy breaks.
Situation update, I took the heater block off and heated it to 215 degrees. I tried to manually push filament through but it wouldn’t go so it is jammed. It turns out that I don’t have a .3mm drill bit so I am going to pick one up later. If I mess this up, is there a way to get another heater block and nozzle?
Yes. I highly suggest buying the custom aftermarket hotend that a gentleman here makes. It work great and is very easy to service if clogging or something happens. And can also buy regular replacement nozzles unlike the zim proprietary nozzle it comes with. The website is www.3dprintermods.com
There is a good technique to clean up the nozzles.
Setup the Heat to 240/250 (even with PLA) and extrude FAST 200mm/min and helping the extrusion with your hand. ectrude aboit 20cm of filament. This technique solve 80% of the problems 
in a second step, you can also use electric wire to unclog the nozzle.I dont have a 0.3 drill and I am scared to break it into the nozzle. the electric coper wire is more flexible and works fine.
I am working to lauch a manufacturing batch of original nozzles instead of changing heater block and get regular nozzles. I am quite happy with the result of this nozzle system.
i am looing to manufacture some new replacement nozzles. 
zeepro recommended heating up the nozzles then unscrewing them and trying to jam a small allen wrench into the top side. HOWEVER, this is really tricky and you can easily burn the crap out of yourself trying to handle this 220C nozzle.
If you learn to retract the filament back into the cartridge, you can basically remove your teflon tube very easily by pushing down on the retaining lock while you wiggle the tube up. Once you have it free, pull out the remaining piece of filament and get a piece of steel control rod for making RC airplanes and such. Mine measures 1.37mm dia. (0.054") about 8 inches long. Bend a ‘L’ shape 2" + 6" so you have something to hang onto. Then it’s super easy to heat the nozzle and push that rod down past the extruder gear and into the nozzle.
Looks like your teflon tube is already removed in that picture. You can just heat it up and retract via one of the menus, or you can just yank it out of there after you heat to 190C or 200C manually first.
Your print does look like something keeping the filament from coming out.
Convert to not using the cartridges soon Those also jam a lot.
Take back control with OctoPrint
I dont know where you found this zeepro procédure  witch could be an extreme case of unclogging.
The procedure from zeepro was to remove the teflon tube and insert a long 1.5 allen wrech in place of the filament. the wrench easily pass thru the gears and get into the nozzle. exactly like you discribe it with your steel rod
the reason zeepro ask to overheat is for the case of the nozzle have been used with ABS filament and somme ABS remains blocked in the nozzle.
I think BDub might be referring to the original zeepro procedure for clearing a clog found here: http://zimsupport.zeepro.com/support/solutions/articles/5000049257-how-to-unclog-the-nozzle
Basically, heat the nozzle up and remove it hot, and then stick a hex wrench through it while trying not to burn yourself… I had to do it once and decided never to do it again. This procedure led to the contribution of various backers of design changes to prevent jams for good. So far so good, the mods work much better than the original design.
 What a good souvenir in SF
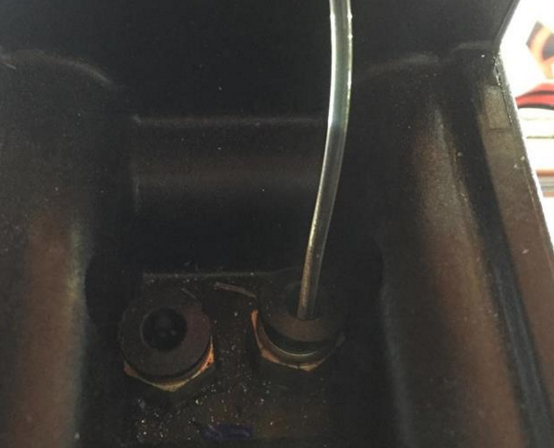
You can see the very first head fixture system that have been replaced by pneumatic fittings.
It was the very first procedure. It was usefull in some specific cases.
As shown it was in casre of having some filament broken or melted in the extruder zone.
Amazing that this procedure continue to exist. It have been written for a specific baker !
the Second procedure was like you said. Remove the Teflon tube and filament, heat to 240/250, insert a 1.5mm Allen wrech and push to extrude the melted zone.
Could you please forward the support link for the “2nd” procedure. The procedure linked above was the only one I was aware of… zeepros latest method up until they went out of business afaik.
The procedure BDub describes sounds like a much smarter approach however. I haven’t had a jam in well over a year, but if I get one I’ll likely try that first.
Sorry I dont know where to find this 2nd procedure. I’ve done the full description and pictures for Zeepro but don’t know if they published.
the procedure is pretty much like BDub procedure but using a 1.5mm wrench instead of the RC plane Rod.
I always use this technique to unclog mu Zim nozzles.
these nozzle are Great since I am using this printer I just broke 2 of them.
first time I tried to extrude a filament with bamboo particles. and it seems the particles were bigger than my nozzle hole.
Second time I used a very bad quality filament and I suppose that some material did the same as the previous nozzle.
I can not recommend that “push wrench or rod down the tube” method. If there is a particle clogging the nozzle you will not push it out with that method but instead wedge it further in. Furthermore you will add additional clogging particles and damage the tube or other parts as well. I have killed three nozzles for good with that method.
The recommended method should be the “cold pull” method to try to get the upper filament residues out.
Its basically heating it up to extrusion temp, manually pushing some filament down, shutting off the heater and pull the filament out with most of the residue at some cooler temperature. You will have to find the right temp where its most effective.
Next heat up and drill the hole gently from the bottom. Cold Pull method again to remove the drilling residue.
Next heat up and flush the extruder and nozzle.
I have not had a nozzle since that I was not able to de-clogg since.
My problem with replacement needs is that I damage the brass nozzles somehow with many hours of prints and some scraping due to failures or maybe normal wear and than it can not make a perfect clean squashed line anymore.
Like @3DPrintEvangelist, I also can not recommend the “push so hard that the particles will go through the nozzle”-solution. Last night, I killed one of my nozzles that way. The excessive heat and the high pressure made the plastic throat-piece bulge out at one side and started leaking. After I disassembled the nozzle assembly, it was clear that the throat-piece with the teflon insert is irrepairably broken. Even worse, I also broke the nut when I tried to get it off the deformed throat.
I can make the throatpiece by myself, but not the nut. If anybody had some spare-nuts, I´d be happy to buy two of them.
OUPS … you are not supposed to push very hard. the goal of using a Allen wrench is to pull out the material from the nozzle (a Ball allen wrench) and also to force gently the output.
As the wrench is cold the melted filament freeze on it and you pull it out of the melted zone.
@J_Schmidt, you are right. If you push too hard the over pressure cause the nozzle leaking.
Anyhow, I admit that your method is cool also. but I really dont like to use a drill in the nozzle hole.